Gnoppix GPG Encryption
Before you ask, yes, this is another key generator. I know there are already a few tools available. However, most of them are overkill and often lack easily accessible source code.
Transparency is the critical factor when creating something as private as your encryption keys. The primary goal here is to ensure that when you generate your keys, your passphrase is not uploaded to “somewhere else.” Before using this tool, I strongly suggest reviewing the code—that’s why I’ve written it in Python, making it readable and verifiable by everyone.
For sure, if you’re already a Pro user with an established workflow, you won’t need this tool. But 95% of everyone else may find it useful. If you already have your crypto key set up, you do not need to use the UI component.
A warning before using it: If you have an existing key, you will be asked if you want to replace the old key with the newly generated one. This is an intentional prompt, so there is no need to worry about accidental overwrites.
How it works
Section titled “How it works”
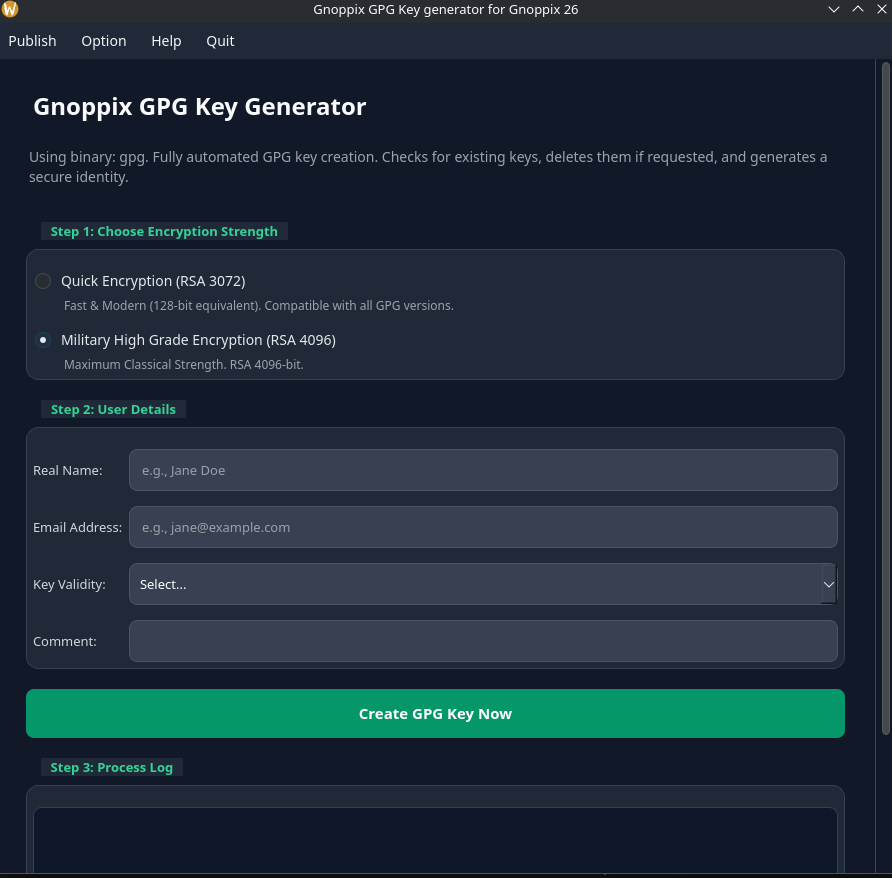
1.) We want use highest and most compatible encryption (RSA4096)
2.) input your Name
3.) input your Email
4.) use something 1y 5y 10y
5.) just a comment field my 2026 encryption key
6.) Ready to go press “create”

After generating your key, you have the option to publish it to key servers. If someone does not have your public key, they will need it in order to encrypt an email to you. This is where the comment field becomes important. If you have an older key, or if you’ve generated multiple test keys, it can be hard to identify the correct one, especially if there are twenty different users with the same name, like “Jane Doe” using “[email protected].” Therefore, use the comment field wisely. You can generate an unlimited number of keys, but you should only upload your final, primary key to the key servers.
Tip: In some cases, it is useful not to upload your key to a key server. A good method is to copy the public key to a USB stick and give it to your friend. Your friend can then import the key and create an encrypted document, put it on the USB drive, and give it back to you.
The same principle is valid for Gnoppix end-to-end GPG-encrypted mail. The safest approach is not to send the encrypted message over the open internet. Instead, you can create the encrypted file or email draft, save it to your draft folder, and ensure the encrypted file never leaves the secure server. This method is secure Gnoppix mail storage uses advanced post quantum encryption. For full understanding, please refer to the document explaining how email works.
https://wiki.gnoppix.org/community/email/
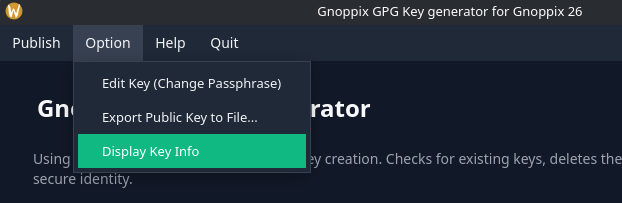
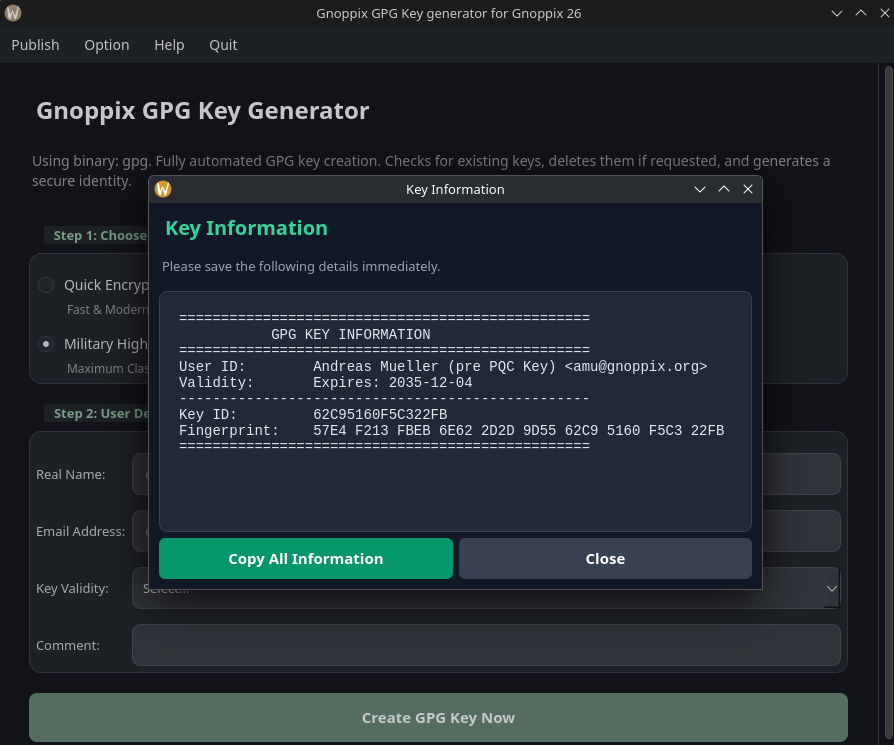
You will be asked what your key information is and what the fingerprint is. Just press the Option button, navigate to Display Key Info, and you will get something like this:
Other useful options are implemented, such as:
-
Exporting your public key in case you want to test with a friend. Your friend can import your public key into their keyring and then send you an encrypted email or file using your public key.
-
Exporting your private key so you can import it into BetterBird (the enhanced Thunderbird mail application).
-
Changing your passphrase to a more complex one.
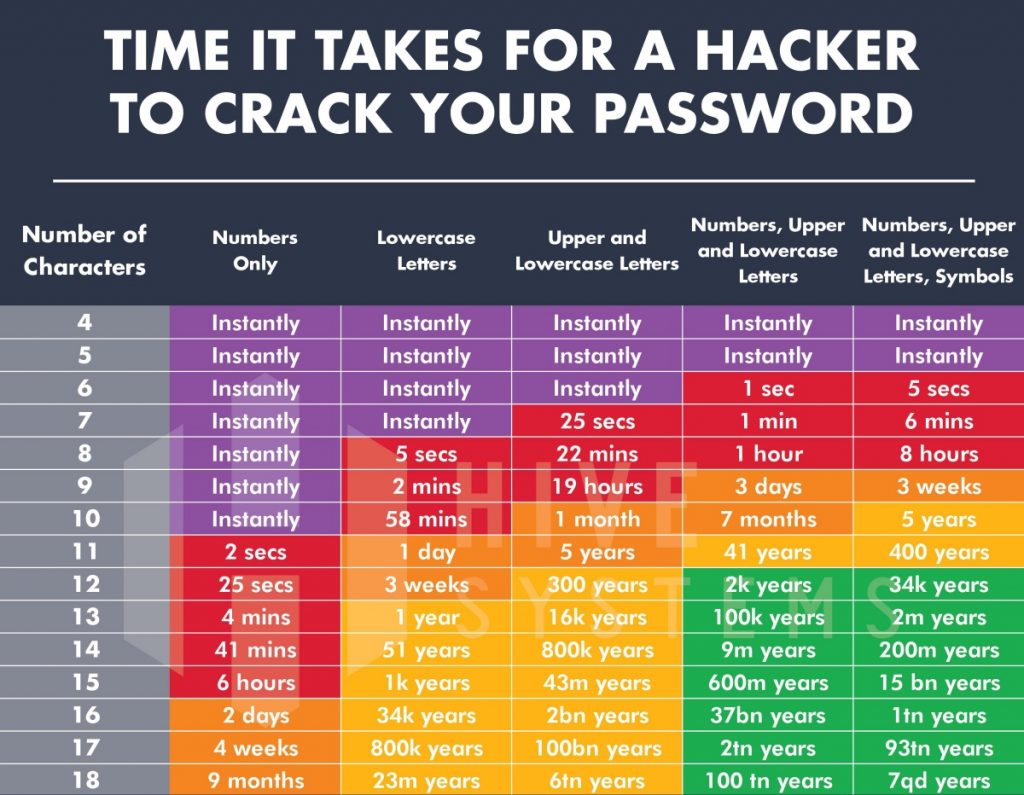
See also how long it would take to decrypt your passphrase:
If you are not using the latest Gnoppix Linux (e.g., Gnoppix 26), you will miss other functions that are not implemented in older versions.
Github: https://github.com/gnoppix/gnoppix-gpg
Exporting your GPG private (or secret) key is a critical step for backing it up or moving it to another machine.
⚠️ IMPORTANT SECURITY WARNING: Your private key is the ultimate secret. Anyone who obtains this file and knows its passphrase can impersonate you. Always handle the exported file with extreme care, use a secure transfer method (like an encrypted drive or secure copy protocol), and delete it immediately after importing it to its destination.
Here is the step-by-step process using the command line:
Step 1: Identify Your Private Key
Section titled “Step 1: Identify Your Private Key”First, you need to know the unique identifier for the key you want to export. You can list all your secret (private) keys using the following command:
gpg --list-secret-keysExample Output:
/Users/username/.gnupg/secring.gpg------------------------------------sec rsa4096/ABC12345 2020-01-01 [EX]uid [ultimate] Your Name <[email protected]>ssb rsa4096/DEF67890 2020-01-01In this example, the Key ID you need is the 8-character or 16-character identifier after the slash on the sec line, which is ABC12345. You can use the email address or the full name, but the Key ID is the most reliable way.
Step 2: Export the Private Key
Section titled “Step 2: Export the Private Key”Use the gpg --export-secret-keys command. You should also include the --armor or -a flag to ensure the output is in ASCII Armored format (.asc file), which is human-readable and safer for transferring via email (though not recommended for this purpose) or simple text editors.
The basic command structure is:
gpg --export-secret-keys --armor [Key ID or User ID] > private-key-backup.ascUsing the Key ID from the example:
gpg --export-secret-keys --armor ABC12345 > my_private_key.ascAlternatively, using the email address (User ID):
What Happens Next?
Section titled “What Happens Next?”- GPG will typically prompt you to enter the passphrase for the secret key. This is a security check to ensure you are authorized to export it.
- Once you enter the correct passphrase, the GPG tool will create a text file named
my_private_key.ascin your current directory. - The contents of this file will look like a block of scrambled text starting with:
-----BEGIN PGP PRIVATE KEY BLOCK-----
Step 3: Verify and Secure the File
Section titled “Step 3: Verify and Secure the File”After exporting, you should take two final steps:
-
Verify the Export: You can confirm the file contains your key by trying to import it temporarily on a different test machine or by listing the contents:
Terminal window gpg --list-packets my_private_key.asc(This will show the key data without actually importing it.)
-
Move to Secure Storage: Immediately move the
my_private_key.ascfile to a secure, offline location, such as an encrypted USB drive, a secure cloud storage vault, or a dedicated backup solution. Do not leave it on your primary hard drive.
Pro Tip: Exporting All Keys
Section titled “Pro Tip: Exporting All Keys”If you want to export all your private keys at once (useful for a complete backup or migrating a full key environment), you can omit the Key ID:
gpg --export-secret-keys --armor > all_secret_keys_backup.asc